
Design and Photography for Velcro Companies by Kathy Beymer from Merriment Design.
Skill Level: No experience necessary.
Crafting Time: Less than 1 hour per centerpiece.
Take a trip down memory lane with these easy DIY photo centerpieces for wedding receptions. These centerpieces feature photos of the happy couple that you can print yourself or purchase photo magnets to reuse on your refrigerator.
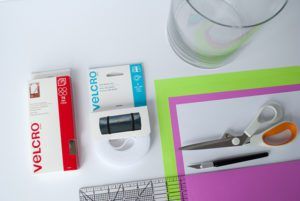
Materials:
– VELCRO® Brand ONE-WRAP® Roll in white – 25mm
– VELCRO® Brand Thin Clear Fasteners – 0.9cm coins or strips
– White Cardstock (or small instagram magnets or photos)
– Coloured Paper
– Large Vases
– Fresh Flowers or Candles
Tools:
– Scissors
– Craft Knife, Ruler and Self-Healing Cutting Mat
We like that you can play around and tweak the centerpieces until you are happy with the look …add photos, switch them around, add and remove rows. It’s easy to move things around – the VELCRO® fasteners make it removable, adjustable and easy.
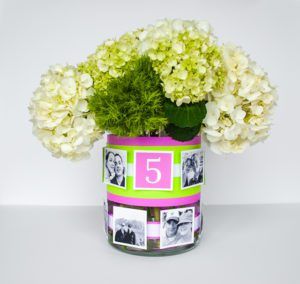
This sentimental idea is super versatile: Use baby photos of the couple and coordinate ages with table numbers (photos of age 5 at table 5). Or share photos of memorable vacations together (Hawaii on table 4). Or flip the focus onto your friends and family by sharing photos of the your friendships at each table or something guests have in common (Michigan State photos for alumni at Table 1).
You can make these DIY photo centerpieces well ahead of the wedding and fill them with flowers or candles when the big day comes.
And when the wedding reception is over, just unwrap the centerpieces to re-use vases, photos/magnets and VELCRO® Brand ONE-WRAP® Roll in your new home together.
Are you ready to get started? Let’s start by browsing those Instagram feeds…
Easy DIY Centerpieces
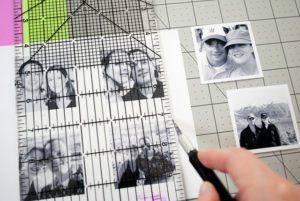
1. Print photos and table numbers with a small white border and cut out using a craft knife, ruler and self-healing mat. My squares were 63.5mm x 63.5mm to fit my vase. Alternatively, purchase square photo magnets or prints. Repeat for table numbers.
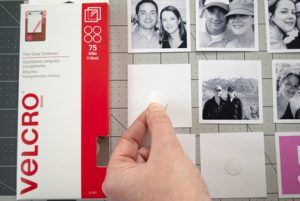
2. Peel and stick the hook (scratchy) side of VELCRO® Brand Thin Clear Fasteners onto the backs of photos and table numbers.
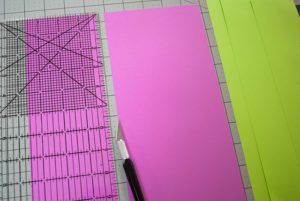
3. Cut strips of colored paper to match your wedding colors. Make them wide enough to wrap around your vases, using two sheets if needed (my purple strips were 101.6mm tall and the lime green were 76.2mm tall).
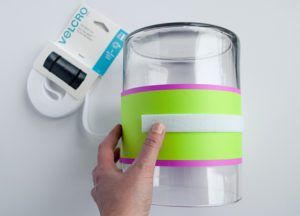
4. Wrap the paper around the vase. Optionally for larger vases like mine place the loop (soft) side of one VELCRO® Brand Thin Clear Fastener on each paper seam to secure (this step may not be needed for smaller vases because the VELCRO® Brand ONE-WRAP® Roll can hold on the paper by itself).

5. Wrap VELCRO® Brand ONE-WRAP® Roll on top of the paper and cut to size. It will attach to the loop side fasteners if you used them in the previous step.
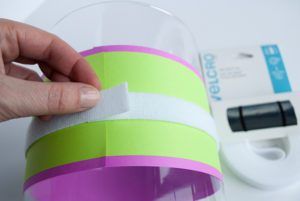
6. Overlap the VELCRO® Brand ONE-WRAP® Roll to hold – it sticks to itself!
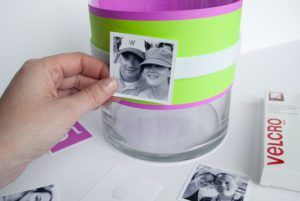
7. Add photos and table numbers to the VELCRO® Brand ONE-WRAP® Roll. Ah, memories! Here’s a tip: cover the seams of the VELCRO® Brand ONE-WRAP® Roll with table numbers.
9. Repeat around the vase. Move photos or magnets around until you get the look you want.
10. And add additional rows as desired.
What a great looking centerpiece, and you can make a bunch in a short time period if you get a few friends together to help out!
Don’t forget to pick up all of the official VELCRO® Brand Products you need!


